
Knowing how to tie a necktie is an important skill for every man.
Formal occasions such as business meetings, job interviews, and weddings require classic, symmetrical knots that look polished and professional. Casual gatherings allow for simpler, relaxed knots that are easier to tie.
Different tie knots have also gained popularity through movies, fashion trends, and cultural traditions around the world. Some knots originated in specific countries and became global favorites.
Learning various types of tie knots helps you match your style to any situation. A well-tied knot shows attention to detail and confidence. In this guide, we’ll walk you through different tie knots that every man should know.
You’ll learn step-by-step instructions on how to tie each knot, along with tips on when and where to wear each tie knot type. By the end, you’ll choose the perfect knot for any outfit or event.
What You Need to Know Before Tying Different Tie Knots
Before learning different tie knots, you need the right tie and setup. Ties come in various materials like silk, wool, cotton, and polyester. Each fabric affects the appearance of your knot.
Skinny ties work best with smaller knots, while wide ties need larger knots to look balanced. Always tie your knot in front of a mirror so you can see what you’re doing.
Stand straight and drape the tie around your neck with the wide end hanging longer than the narrow end. The wide end should reach about 12 inches below the narrow end when you start.
Practice makes perfect when tying different tie knots. Aim for symmetry and make sure the finished tie reaches your belt buckle.
Different Tie Knots for Every Occasion
Let’s review the most common types of tie knots you can master. Here are eight different tie knots for every occasion.
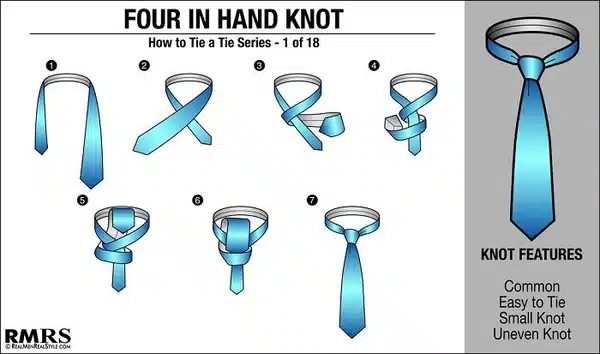
1. The Four-in-Hand Knot (Easy & Classic)
Difficulty Level: Easy
Best For: Beginners, casual events, semi-formal occasions, narrow collars
The Four-in-Hand is the most popular knot because it’s simple to learn. This slightly asymmetrical knot works with almost any tie and shirt.
Step-by-Step Instructions:
- Drape the tie with the wide end on your right, hanging 12 inches lower.
- Cross the wide end over the narrow end.
- Wrap the wide end around the narrow end once.
- Pull the wide end up through the neck loop.
- Thread it down through the front knot and tighten.
Pro Tip: Keep this knot slightly loose for a relaxed look.
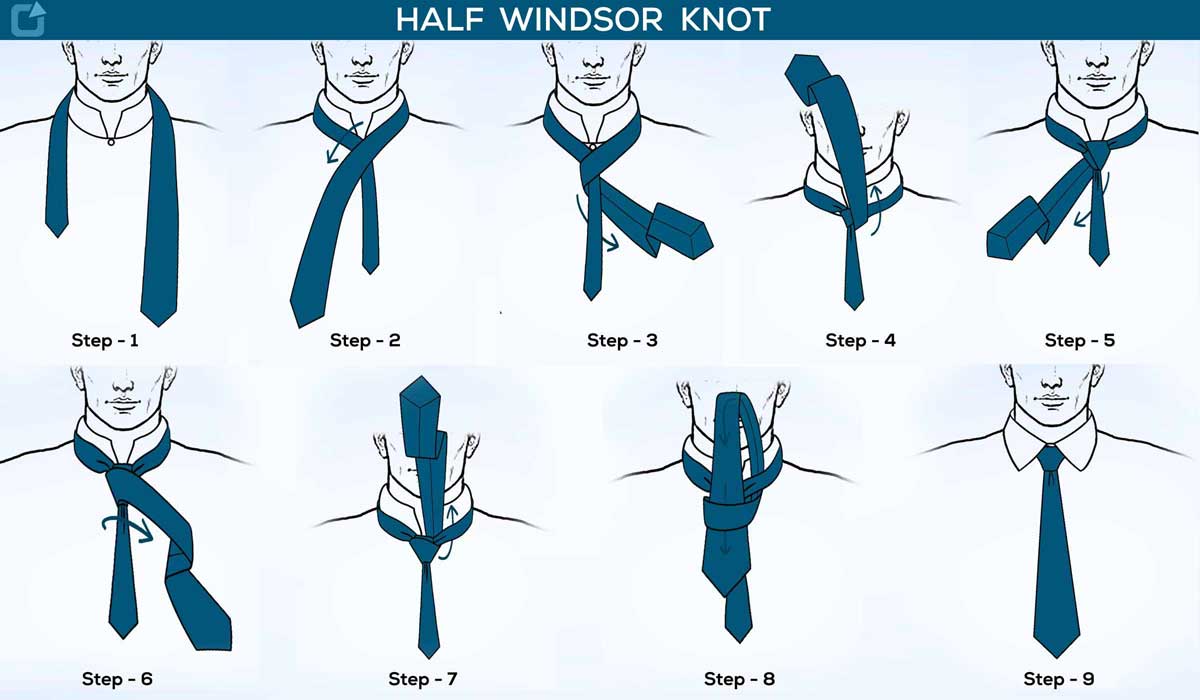
2. The Half Windsor Knot (Balanced & Professional)
Difficulty Level: Moderate
Best For: Business meetings, interviews, standard collars, medium-width ties
The Half Windsor creates a symmetrical, triangle-shaped knot that looks professional. It’s one of the most reliable tie knot types for work.
Step-by-Step Instructions:
- Cross the wide end over the narrow end.
- Bring it around and behind the narrow end.
- Pull the wide end up through the neck loop.
- Wrap it across the front from right to left.
- Bring it up through the neck loop again and down through the front knot.
- Tighten and center the knot.
Pro Tip: Works perfectly with spread collars.
3. The Full Windsor Knot (Formal & Bold)
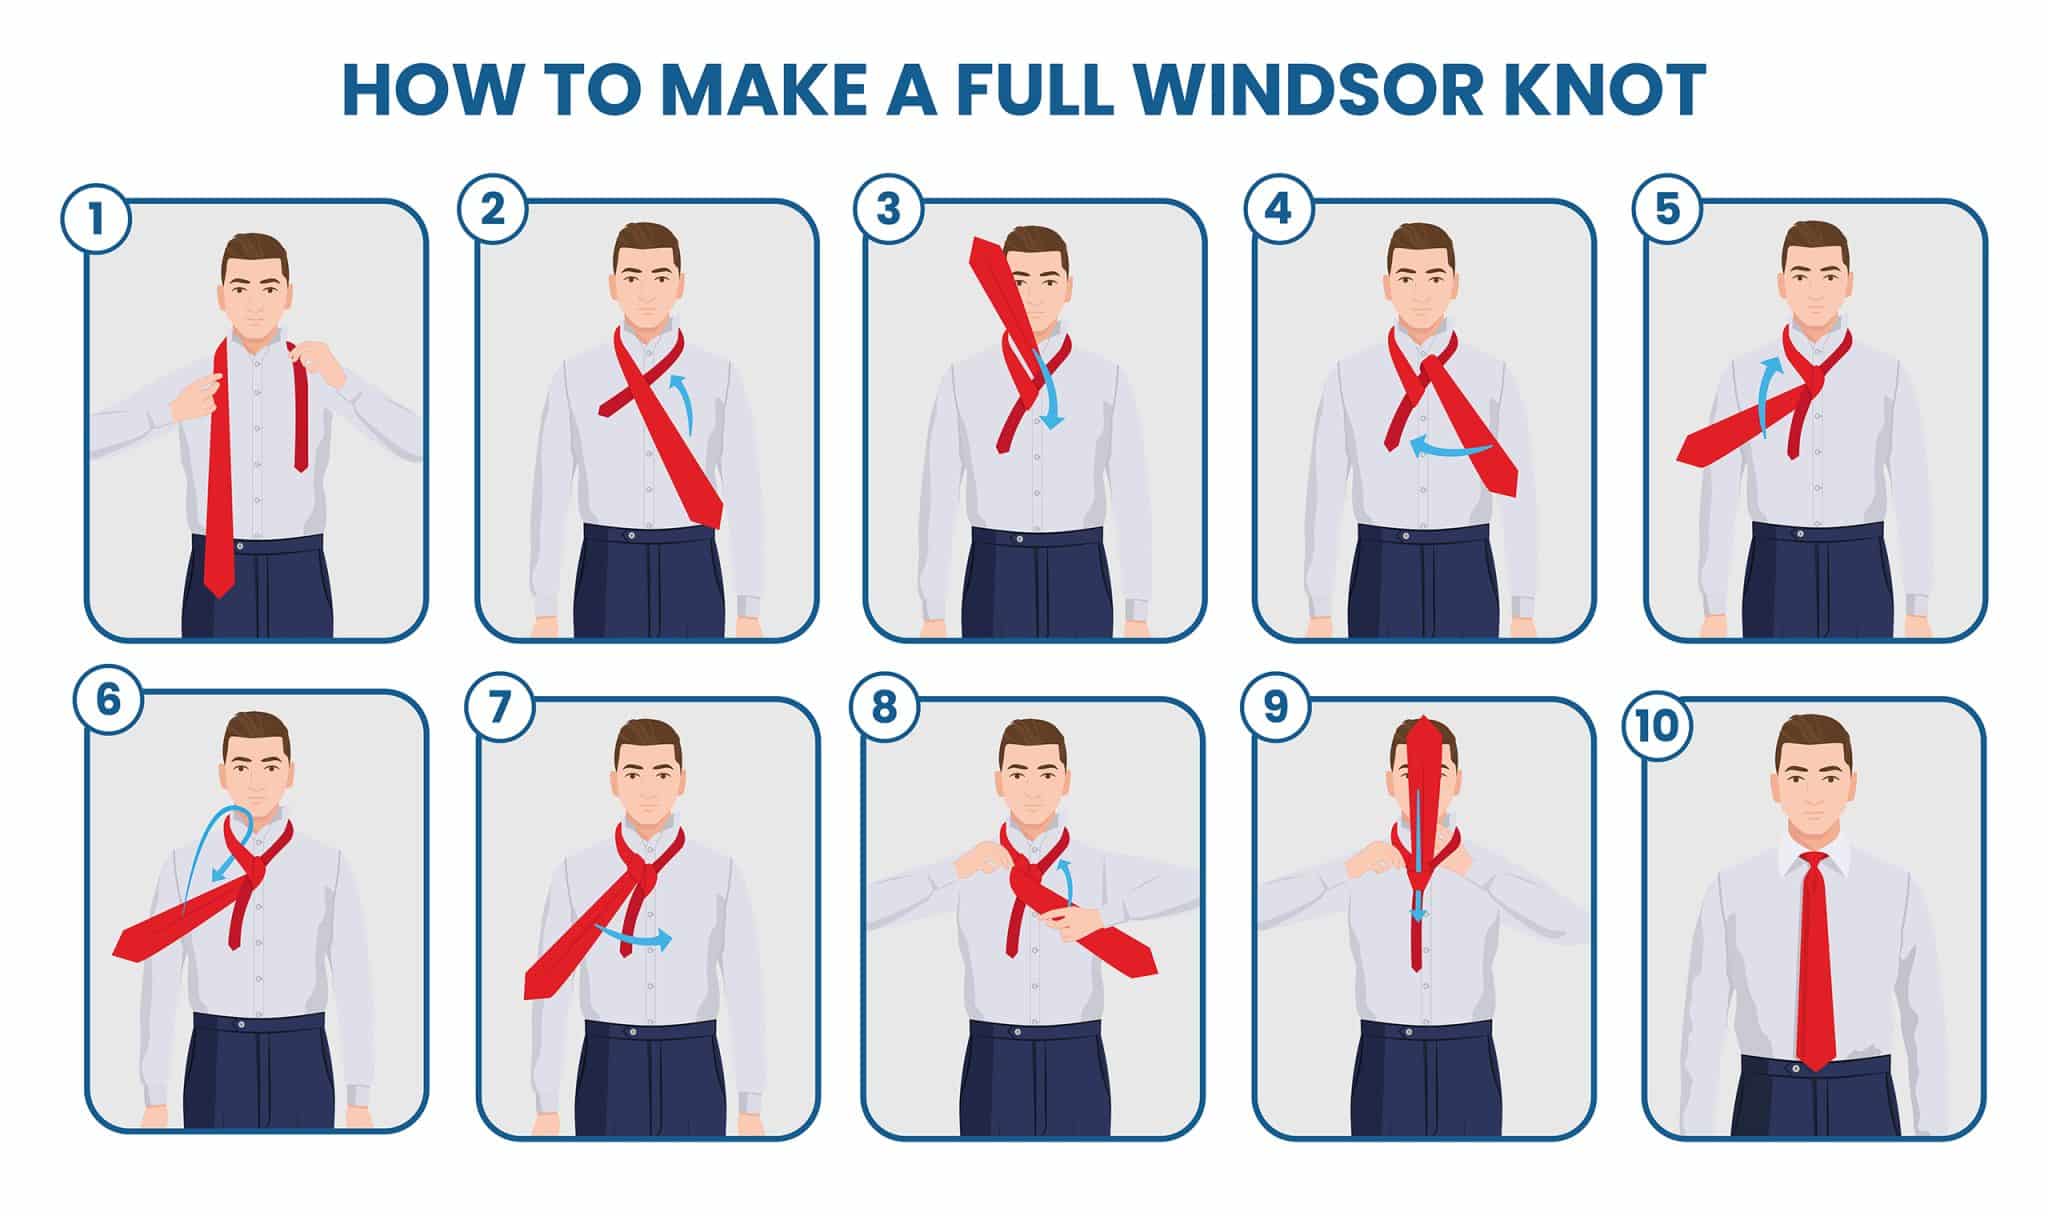
Difficulty Level: Advanced
Best For: Weddings, formal events, wide-spread collars, thick ties
The Full Windsor is a large, symmetrical knot for important events where you want to look confident.
Step-by-Step Instructions:
- Start with the wide end much longer than the narrow end.
- Cross the wide end over and pull it up through the neck loop.
- Bring it under the narrow end from left to right.
- Pull it up through the neck loop again.
- Wrap across the front and bring it up through the neck loop once more.
- Thread down through the front knot and tighten.
Pro Tip: Use longer ties for this knot.
4. The Pratt (Shelby) Knot (Neat & Modern)
Difficulty Level:Easy to Moderate
Best For: Daily office wear, medium-width ties, standard collars
The Pratt Knot is a modern favorite that sits between the Four-in-Hand and Half Windsor in size.
Step-by-Step Instructions:
- Place the tie inside-out around your neck.
- Cross the narrow end over the wide end.
- Pull the wide end up through the neck loop.
- Bring it across the front from right to left.
- Pull up through the neck loop and thread through the front knot.
Pro Tip: Starting inside-out gives the cleanest finish.
5. The Kelvin Knot (Tidy & Compact)
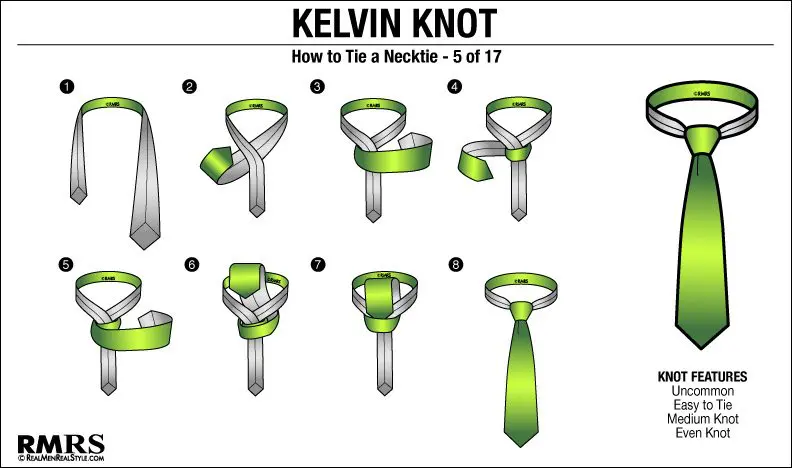
Difficulty Level: Moderate
Best For: Thick fabrics, wool ties, casual Fridays, point collars
The Kelvin Knot works wonderfully with thicker tie materials and creates a sleek appearance.
Step-by-Step Instructions:
- Drape the tie inside-out around your neck.
- Cross the wide end under the narrow end.
- Wrap the wide end around twice.
- Bring it up through the neck loop.
- Pull down through both front loops and tighten.
Pro Tip: This knot stays secure all day.
6. The Eldredge Knot (Creative & Statement-Making)
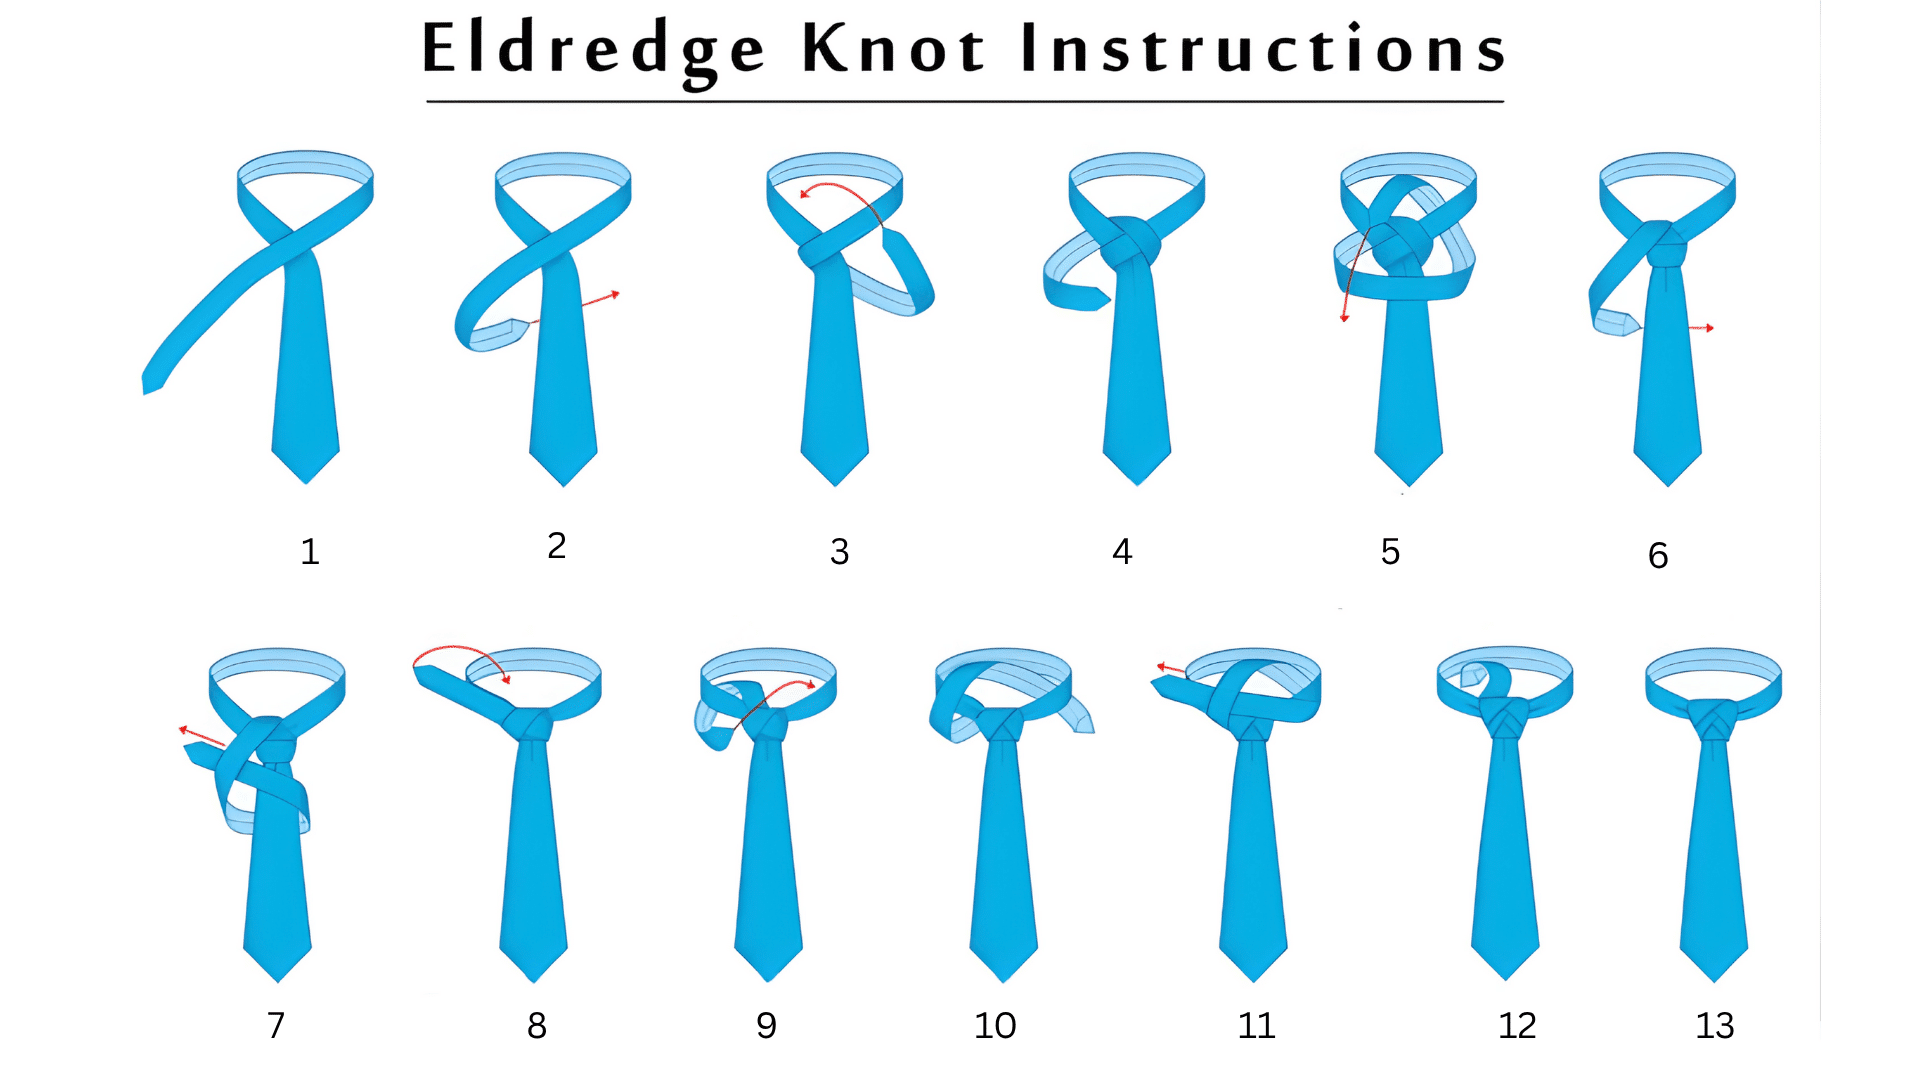
Difficulty Level: Advanced
Best For: Fashion events, parties, creative industries
The Eldredge Knot features a woven pattern that draws attention. Among all the different tie knots, this one is the most decorative.
Step-by-Step Instructions:
- Position the narrow end much longer (it creates the knot).
- Cross the narrow end over the wide end.
- Weave the narrow end in and out through the neck loop multiple times.
- Create a braided effect by continuing the weaving pattern.
- Tuck the remaining narrow end behind the neck loop.
Pro Tip: Practice before wearing it out and watch video tutorials.
7. The Trinity Knot (Modern & Trendy)
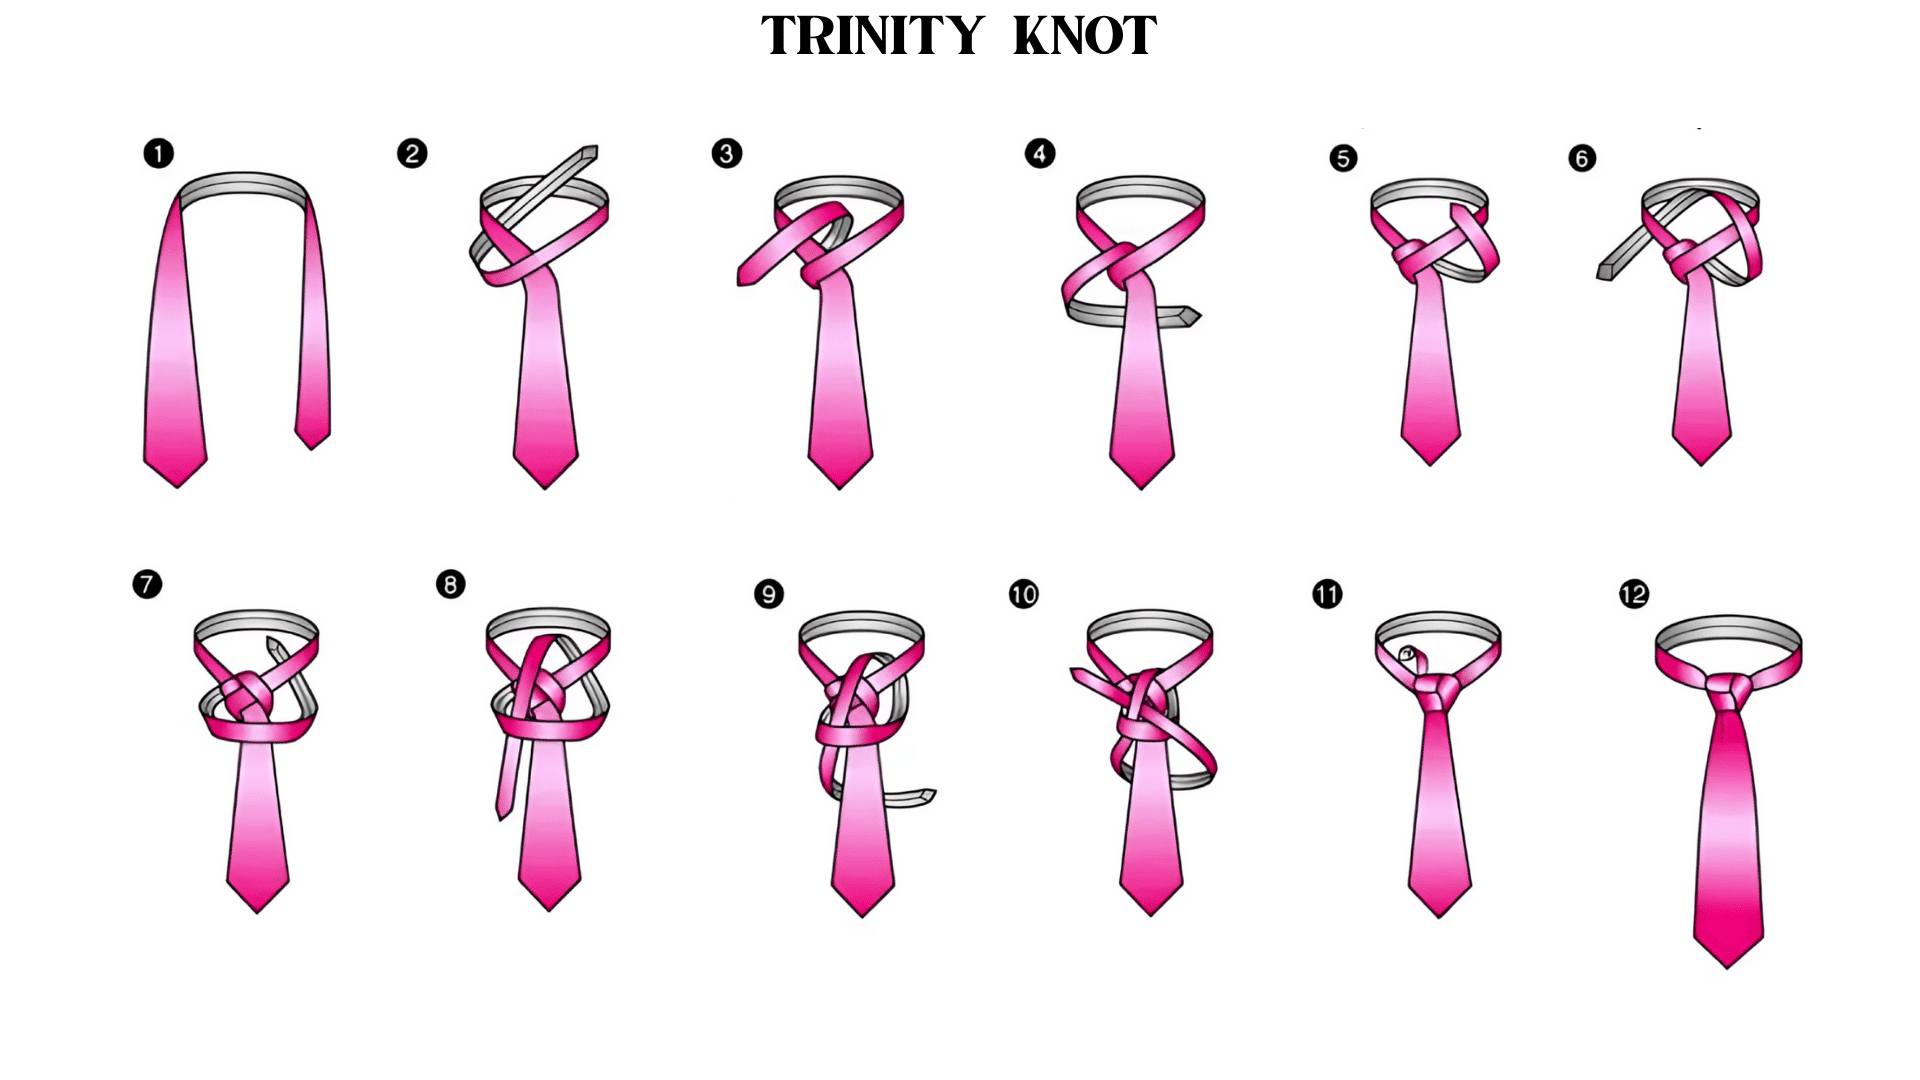
Difficulty Level: Advanced
Best For: Special occasions, creative outfits, fashion-forward events
The Trinity Knot creates a threefold pattern that looks like a Celtic symbol. This is one of the newer types of tie knots that has gained popularity on social media.
Step-by-Step Instructions:
- Use the narrow end to create the knot.
- Cross it over and bring it up through the neck loop.
- Wrap around the forming knot, going in and out.
- Continue creating the three-pointed pattern.
- Tuck the narrow end behind to finish.
Pro Tip: Choose solid colors to show off the design.
8. The Oriental Knot (Simple & Efficient)
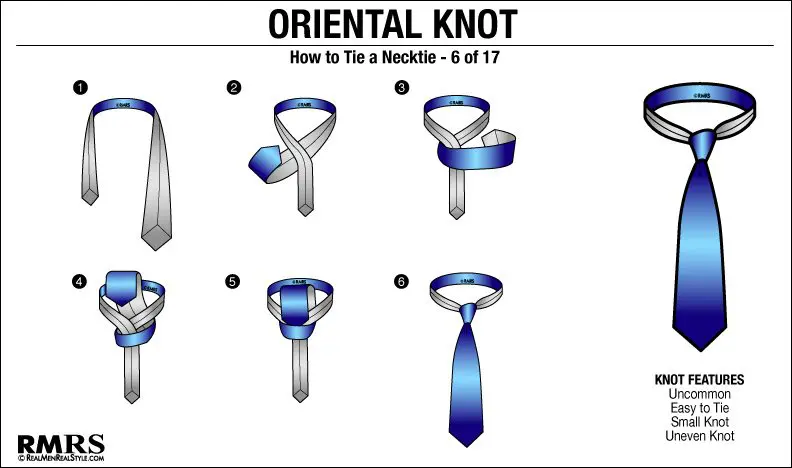
Difficulty Level: Easy
Best For: Minimalists, quick mornings, lightweight ties, casual settings
The Oriental Knot is the easiest of all tie knot types with the fewest steps. Popular in Asia, it’s perfect when you’re short on time.
Step-by-Step Instructions:
- Place the tie inside-out around your neck.
- Cross the wide end under the narrow end.
- Wrap across the front and bring up through the neck loop.
- Thread down through the front loop and tighten.
Pro Tip: Tighten well as this knot can loosen easily.
How to Choose the Perfect Tie Knot for Any Occasion
Picking the right knot depends on where you’re going and what you’re wearing. Different tie knots suit different events and dress codes. Larger knots look more formal and commanding, while smaller knots work well for everyday situations. Consider your collar width, tie fabric, and the impression you want to make.
Here’s a quick guide to help you choose:
| Occasion | Recommended Knot | Why |
|---|---|---|
| Business Meeting | Full Windsor | Confidence & authority |
| Casual Event | Four-in-Hand | Simple yet stylish |
| Wedding | Trinity or Half Windsor | Unique and refined |
| Job Interview | Half Windsor | Professional and balanced |
| Creative Event | Eldredge | Bold and artistic |
Match your knot to the situation for the best results.
Common Tie Knot Mistakes and How to Fix Them
When learning different tie knots, avoid these common errors.
- Don’t leave the tie too short or too long; it should reach your belt buckle.
- Always create a dimple below the knot for a polished look.
- Match your knot size to your collar width.
- Practice each knot several times to get it right.
Final Thoughts
Mastering different tie knots is a valuable skill that helps you look your best at any event. If you’re heading to a business meeting, wedding, or casual gathering, knowing multiple types of tie knots gives you the confidence to dress appropriately.
Each knot has its own character and purpose, from the simple Four-in-Hand to the intricate Trinity Knot. Don’t be afraid to experiment with various tie knot types until you find your favorites.
Start with the easier knots and gradually work your way up to the more complex ones. Practice in front of a mirror until the movements become natural. The right knot can express your personality and show attention to detail.
Remember, there’s no single “best” knot, only the right knot for the right moment. Keep practicing these techniques, and soon you’ll be able to tie any knot with ease. Your improved tie-tying skills will serve you well throughout your personal and professional life.
Frequently Asked Questions
What’s the Easiest Tie Knot to Learn?
The Four-in-Hand is the simplest and quickest knot, perfect for beginners.
Which Tie Knot Is Best for Formal Occasions?
Among different tie knots, the Full Windsor or Trinity knot works best for weddings, presentations, and formal events.
How Do I Make My Tie Knot Look Perfect?
Make sure both sides are even, adjust the length so it reaches your belt buckle, and create a small dimple below the knot for a polished look.