
Money piece hair involves coloring a small section of hair on one or both sides of the face for a subtle yet elevated look.
This face-framing trend has taken over feeds everywhere, and for good reason.
It brightens your complexion, works on nearly every hair type, and does not require a full color overhaul.
Whether you want a soft, natural look or a high-contrast statement, this guide walks you through everything you need, from tools and bleach ratios to toning and aftercare, so that you can get the look right the first time.
Quick Overview
Money piece hair involves coloring a small section of hair on one or both sides of the face for a subtle yet elevated look.
This face-framing trend has taken over feeds everywhere, and for good reason.
| Detail | Info |
|---|---|
| Time Needed | 1–2 hours |
| Difficulty Level | Beginner to Intermediate |
| Cost (DIY) | $10–$30 |
| Cost (Salon) | $75–$400 |
| Hair Types | All hair types and colors |
| How Long It Lasts | Full touch-ups every 12 weeks or longer; toner refresh every 6–8 weeks |
Money piece hair is one of the most accessible color techniques out there. Start with a strand test, take your time with sectioning, and do not skip the toner step.
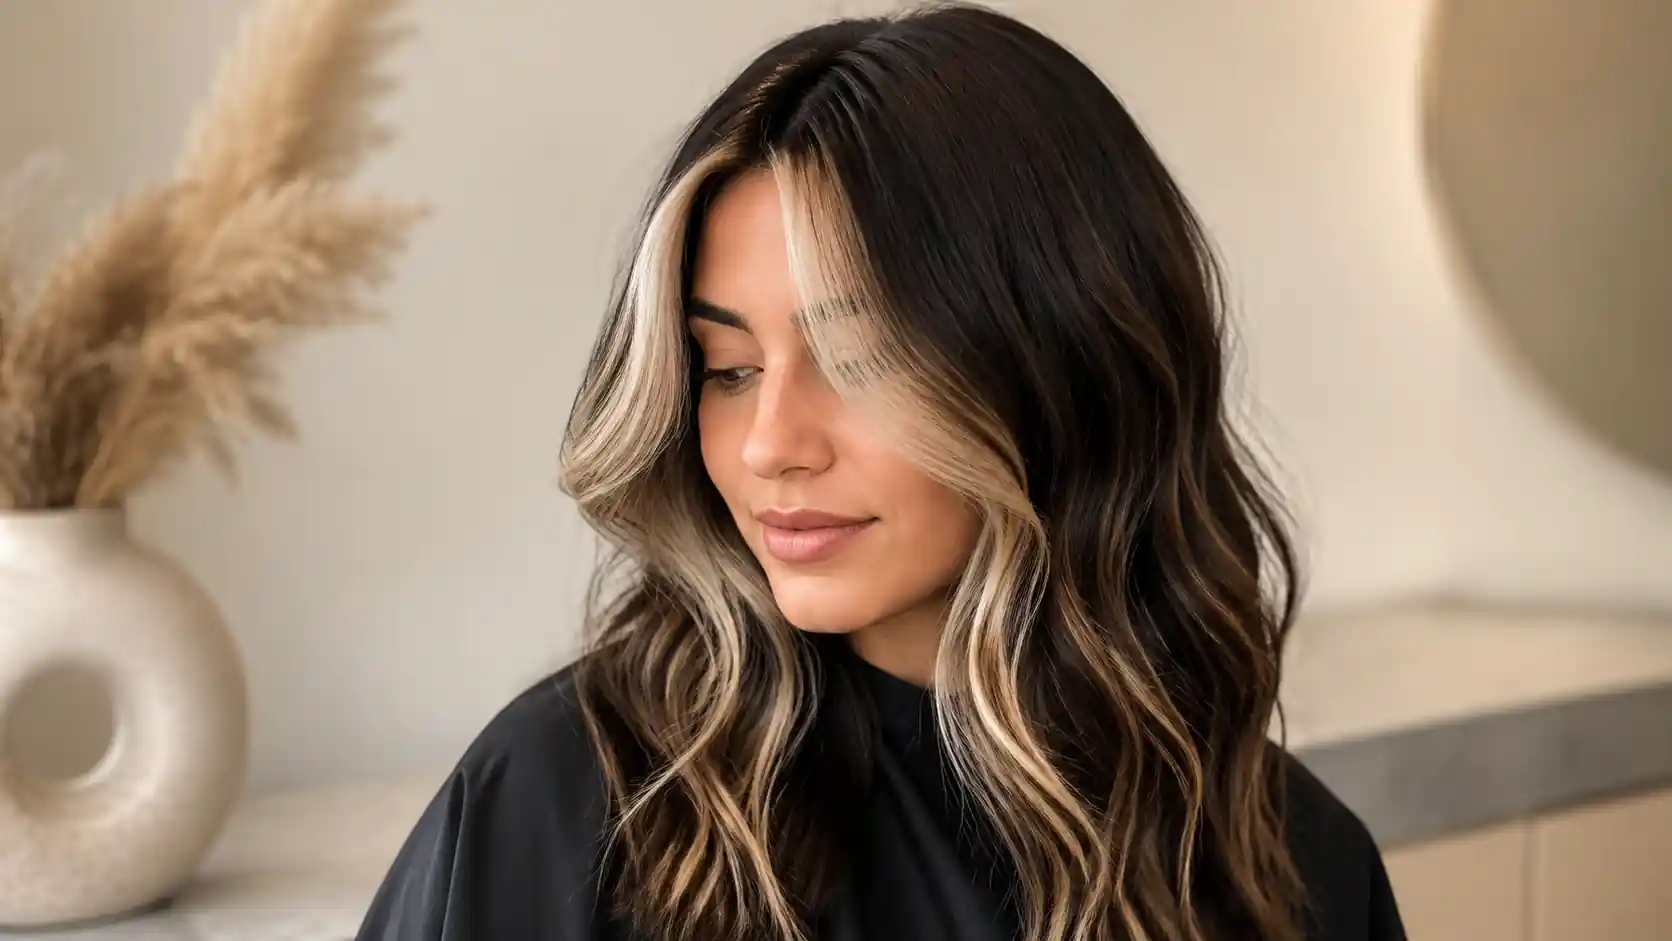
What is Money Piece Hair?
Money piece hair is a hair-color technique that involves placing lighter, face-framing highlights in the front sections of your hair.
These bright streaks help illuminate the face, create depth, and add a touch of glamour without requiring a full head of highlights.
Money piece highlights are limited to the front sections near the hairline.
Originating in the early 2000s, these highlights became popular for their ability to brighten the face and add dimension to hair.
Initially characterized by thick, chunky highlights outlining the face, the trend has shifted over the years.
Celebrities like Jennifer Lopez and Kim Kardashian helped bring the look back into mainstream style, and it has remained a staple since.
Why Try Money Piece Highlights
Money piece highlights offer real, visible results with far less commitment than a full color service. Here is what makes them worth it.
- Brightens skin tone and makes the complexion look more awake and lifted.
- Intensity is fully adjustable, from a one-shade lift to a bold, high-contrast pop.
- Works on all hair types and colors, including dark brown, gray, and black hair.
- Lower cost and shorter processing time compared to full-head highlights.
This flexibility is what keeps Money Piece highlights relevant season after season.
Tools & Supplies
|
How to Do Money Piece Hair
Getting money piece hair right comes down to preparation, precision, and patience.
Follow these five steps whether you are doing this at home or using it as a reference before your salon visit.
Step 1: Plan Your Placement
Before touching any product, decide where your money piece highlights will sit. Most placements start at the part line and fall around cheek level.
The width of the section being lightened matters, so consider whether you want a thin, delicate slice or a thicker, bolder one before moving forward.
Choosing the right width and position upfront prevents uneven results and makes every step after this one much easier to execute.
Pro Tip: Make sure the highlight looks good from every angle, not just the front view.
Step 2: Section Hair for Highlights
Part your hair the way you normally wear it, then separate the front face-framing strands that will become your money piece.
Section out a horseshoe section at the top of the head, leaving out the bang area, and clip everything else away for control.
Clean, precise sectioning keeps the rest of your hair protected and makes lightener application much more accurate and manageable from start to finish.
Pro Tip: Keep the sections fine and back-to-back so the hair lightens evenly while also giving maximum lift.
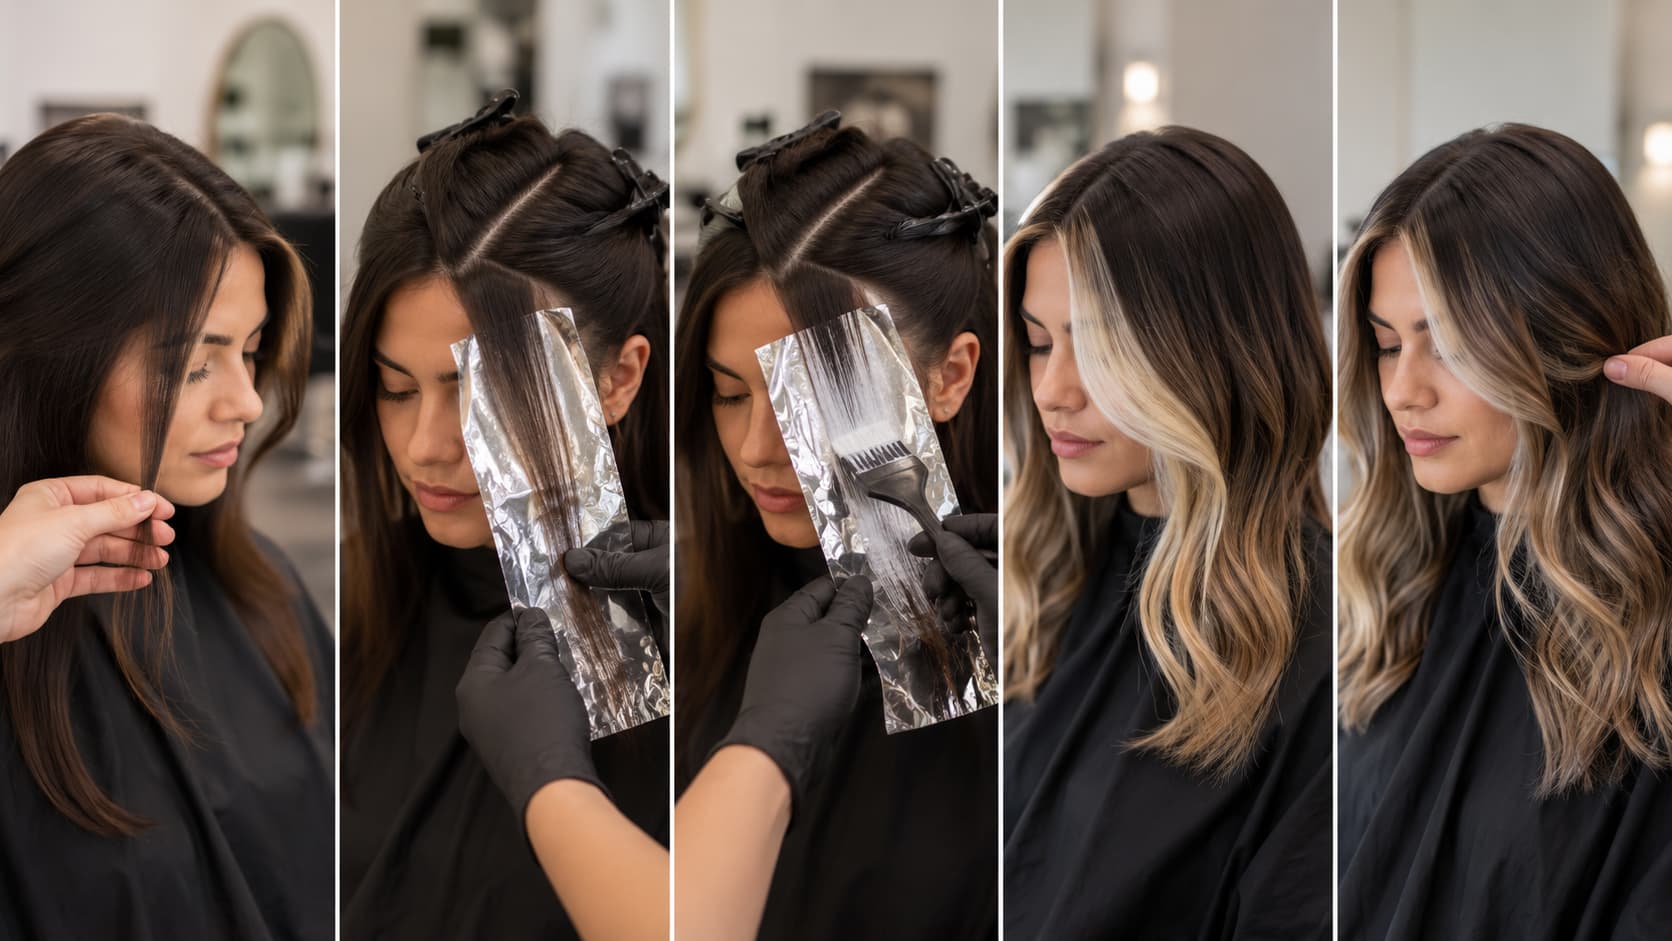
Step 3: Apply Lightener
Mix your lightener and developer to a smooth, creamy consistency, then apply it using a tinting brush to the isolated sections.
Start from mid-length and work toward the ends first, then go back to the roots.
Using foils to lighten the section low and slow provides the most controlled, even lift, especially on the longest pieces closest to the face.
Wrap in foil for more saturated, consistent results on darker hair.
Pro Tip: When applying lightener around the hairline, bring it to the root then angle it back for a seamless connection.
Step 4: Monitor Lift and Tone
Dark hair travels through warmer stages like red, orange, and gold before reaching a level that can be toned cool or neutral, so watch the lift closely rather than relying only on a timer.
Once the desired lift is reached, rinse thoroughly, then apply a toner to neutralize brassiness and bring the money piece highlights to the right final hue.
Pro Tip: Check the hair every 10 to 15 minutes. Apply toner to damp, not soaking wet, hair for even color absorption and a more refined finish.
Step 5: Rinse, Condition, and Style
Once toning is complete, rinse thoroughly with lukewarm water.
Use a color-safe conditioner after rinsing to restore moisture to the lightened sections and reduce any post-bleach dryness.
Blow-dry or diffuse as usual. The styled result will showcase the face-framing money-piece highlights at their brightest.
Finish with a lightweight hair oil on the lightened sections to boost shine and lock in softness.
Pro Tip: Adding a bond-building treatment like Olaplex or K18 directly into your lightener helps protect hair structure throughout the bleaching process.
Taking time on each of these five steps is what separates a clean, polished money piece from a rushed result.
The process does not need to be complicated, but it does need to be careful. Nail the placement, respect the timing, and always tone before you style.
Watch: Money Piece Hair Tutorial
Seeing the technique in action makes every step easier to follow.
This tutorial walks through the full money piece process at home, from sectioning and bleach application to toning.
It covers common mistakes to avoid and gives a clear visual for each stage covered in this guide.
Pay close attention to the toning step, as it is where most at-home results either come together or fall short.
Thanks to the Brad Mondo for putting this together.
Money Piece Hair Variations and Color Ideas
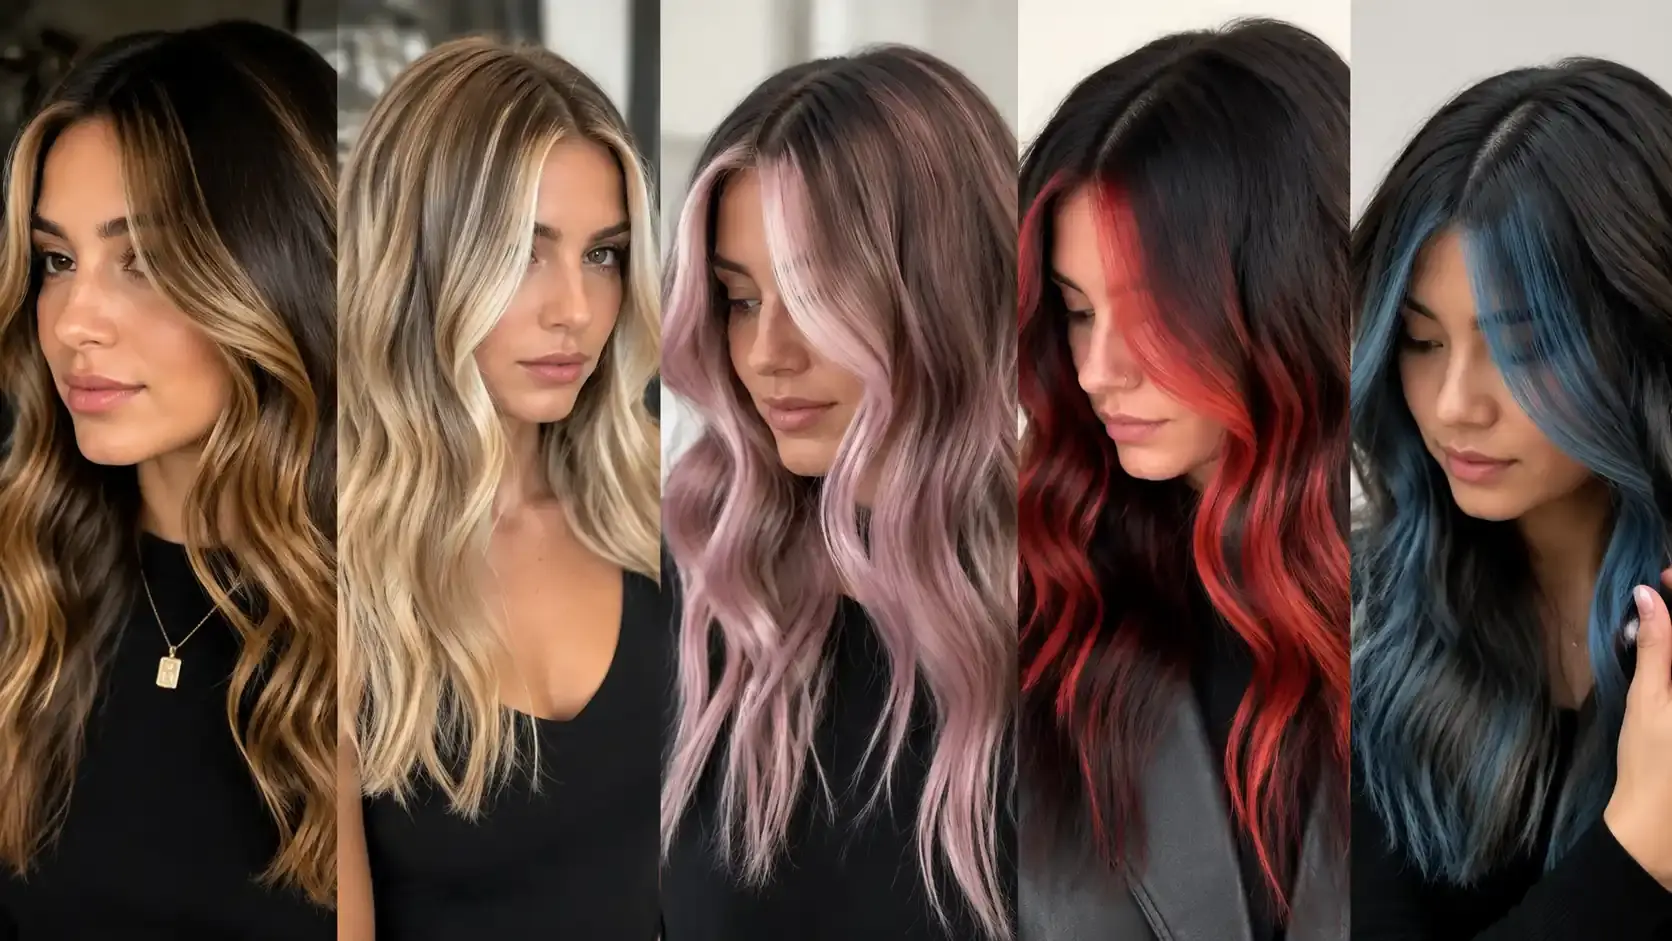
The money piece works across a wide range of colors and finishes. Variations range from softly blended, balanced colors to bold, contrasting options. Here are the most popular directions to consider.
- Caramel: Warm, golden tones that suit medium to dark brown bases beautifully.
- Blonde: A classic high-contrast option that brightens fair and medium complexions.
- Pastels: Soft lavender, blush, or mint shades layered over a pre-lightened section.
- Bold pops: Vivid red, copper, or electric blue for a high-impact statement look.
- Natural sun-kissed: One to two shades lighter than your base for a subtle, lived-in finish.
Mix and match tones with your base color to keep the look cohesive.
Maintenance and Aftercare
Keeping money pieces highlights looking fresh does not take much effort, but it does require a consistent routine.
Use a sulfate-free shampoo and a purple or blue toning shampoo once or twice a week to cancel brassiness between salon visits.
A bond-building treatment like Olaplex No. 3, used weekly, helps rebuild structural damage caused by bleach.
For grow-out, you can bleach the grown-out roots only and recolor the money piece section, or use a toner on the existing color to refresh the tone without re-bleaching.
Most people find they need a toner refresh every six to eight weeks and a full touch-up every three to four months, depending on how fast their hair grows and how bold the contrast is.
A leave-in conditioner and UV-protecting hair spray help preserve the color between sessions.
DIY vs. Salon: Pros and Cons
Both options work well depending on your hair history and comfort level. Here is a quick breakdown to help you decide.
For darker or coarse hair, seeing a professional is strongly recommended, as it is easier to over-lighten, get patchy results, or damage strands without experience in color chemistry.
| Factor | DIY | Salon |
|---|---|---|
| Cost | $10–$30 (kit) | $75–$400 depending on location |
| Time | 1–2 hours | 1–2 hours |
| Precision | Moderate | High |
| Risk | Higher on dark/coarse hair | Low |
| Best for | Light or pre-lightened hair | Dark, coarse, or color-treated hair |
One hairstylist on Reddit noted that simple caramel money pieces at a salon typically run $85–$125 depending on length and stylist. If your hair is already lightened or close to your target shade, DIY is a reasonable option with careful prep.
Face Shape and Placement Tips
Placement is everything with money piece highlights. The right position flatters your features rather than competing with them. Use these four guidelines to adjust for your face shape.
- Round faces: Place highlights slightly higher and thinner to add length and vertical definition.
- Oval faces: Nearly any width works. Keep placement centered near the temples for a balanced look.
- Square faces: Soften the jawline by blending the money piece at a slight angle away from the face.
- Heart faces: Keep sections thinner near the forehead and slightly wider toward the cheekbone area.
Whether you want something soft and tonal or bold and high-contrast, the right placement can change everything.
Conclusion
Money piece hair is one of the most accessible color techniques out there, and this guide gives you everything you need to get started with confidence.
You now know the right tools, the correct bleach ratios, how to tone, and how to care for your color long-term.
Whether you book a salon appointment or take the DIY route, the key is to choose a placement and shade that work for your face shape and natural base.
Start with a strand test, take your time with sectioning, and do not skip the toner step.
The result is a fresh, face-framing look that works for every hair type and color.
Frequently Asked Questions
What Is the Difference Between a Money Piece and a Skunk Stripe?
A money piece uses soft, face-framing highlights while a skunk stripe color-blocks two high-contrast shades side by side for a bolder, more dramatic effect.
Does Money Piece Hair Work on Short Hair?
Yes, money piece hair works on all lengths, including short bobs and pixie cuts. Placement is simply adjusted to frame the face based on your cut.
Will Money Piece Hair Damage My Hair?
A money piece is less damaging than other lightening methods since only a small section of hair is bleached. Proper aftercare minimizes dryness or breakage.
Why Is It Called Money Piece Hair?
The name refers to how little time, product, and foiling it takes a stylist to achieve a high-impact, expensive-looking result.
Can I Get a Money Piece on Previously Colored Hair?
Yes, but your stylist will need to assess your hair’s condition and color history first, as limitations or adjustments may be needed before lightening.